Radio-4-Matic - part 2 - hardware
posted in Electronics by Cargo Cult on Wednesday January 9 2013
Continuing this series on the hacked-together, time-travelling Radio-4-Matic, time for some hardware. This was going to have been a guide to dismembering an old, non-functional radio and rebuilding it from the ground up, using GPIO to read various buttons and controls, but ... I couldn't. So instead, here's a guide to modernising a glorious vintage radio in a minimally invasive, fully-reversible manner...
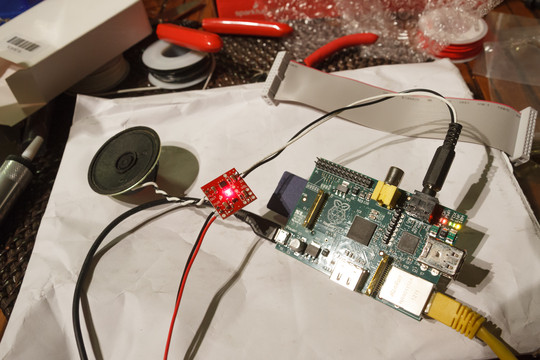
The first prototype for the Radio-4-Matic consisted of the Raspberry Pi, a 5V power supply, USB keyboard, ethernet cable and a cheap monitor with HDMI input. My two-line proof-of-concept audio delay script worked surprisingly well - although it had a tendency to cut out whenever get_iplayer lost connection. Some extra electronics from SparkFun resulted in a more independent, bedside version of the beast - albeit one which suffered from serious mains hum, and which needed an empty cardboard box (formerly containing pasta) to improve the speaker's acoustics.
Such a botch-job could never be a permanent home for BBC Radio 4, obviously.
Some background: like many, I grew up in a house where there'd always be at least one radio switched on, permanently tuned to Radio 4. For us, it was a motley selection of Grundigs, Bushes and an ancient transistorised Cossor belonging to my dad. At some point in the past I'd acquired my grandfather's 1970s Roberts radio - a stylish design of chrome, wood, fake leather and glass. Using such an iconic British brand to surround some modern British electronics sounded like an eminently ridiculous idea - but transatlantic inquiries revealed nobody had the faintest idea where that particular radio had got to.
So, I resorted to eBay.
The plan was to remove the old electronics and drive the old speaker using the already-acquired modern amplifier. Plans brewed in my head, figuring out new GPIO idiocy to interface with the radio's newly liberated buttons and dials. HDMI, USB and ethernet ports on the back - a full-scale case-mod.
It turns out there's a surprising range of vintage radios on eBay, particularly the UK version. Many of which are selling for silly prices, or have sustained serious damage, or are modern DAB efforts that have been miscategorised by opportunistic sellers. Fortunately, I got a proper vintage Roberts R707 that (a) was cheap, (b) was in surprisingly good nick, and (c) had the seller offering transatlantic postage. Unfortunately, it was sold completely untested. But, given I was going to tear everything out and start again, that wouldn't matter, right?
Cue a pretty long pause as the radio winged its way across the Atlantic and the North American continent. The intertubes are way faster...
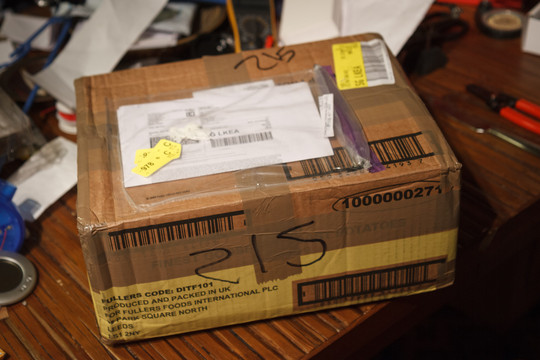
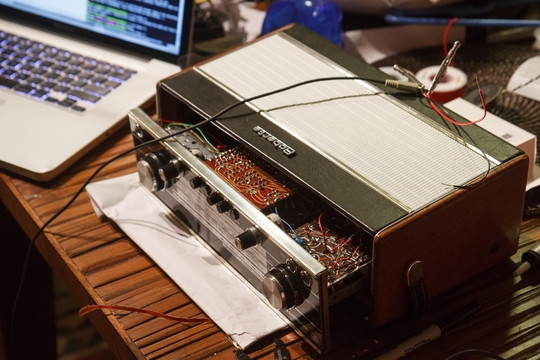
Arrival. One elderly radio, ready for disemboweling. Hang on, this thing looks in almost mint condition. Plenty of space inside to fit a Raspberry Pi without removing any existing systems. And it's got C-cell holders instead of cavernous voids for lantern batteries. A quick trip to Safeway for some new batteries surely won't hurt?
So, perhaps decades after it was last powered up, this vintage British radio took to the airwaves once again, this time in Seattle. VHF armed and ready, aerial extended to its impressively full length, we got tuning. Only to run slap bang into some dubstep.
Poor thing.
At which point I realised that, despite the awful noises the radio was making, it sounded fantastic. Almost terrifying, granny-humping bass - for something designed to live in a middle-class kitchen next to the Aga and relay The Archers, this sounded bloody good. It had to live. To tear out its transistors felt like sacrilege.
But how could it be subverted?
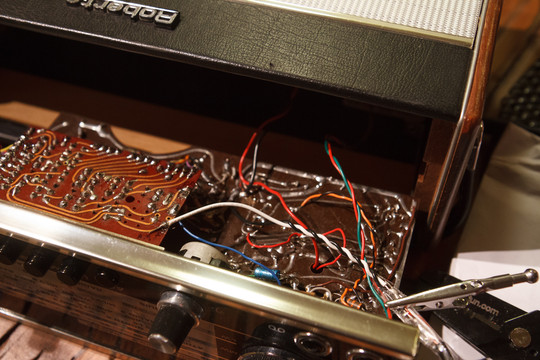
Opening the powered radio up for some exploratory surgery (this time tuned to some vintage Fallout 3 tunes courtesy of NPR), witnessing the frankly disgraceful soldering skills - I wondered about how best to sense its internal signals. Wait - that modern amplifier and speaker from earlier - I could quickly twist some extra wires on to its headphones connector, poke them into solder joints and perhaps listen to whatever was happening inside. That thick PCB trace with black wires leading into it, that's obviously ground - the volume control probably has some audio going through it ...
Music coming out of that tinny little speaker as well as the radio's more dignified effort. Bingo.
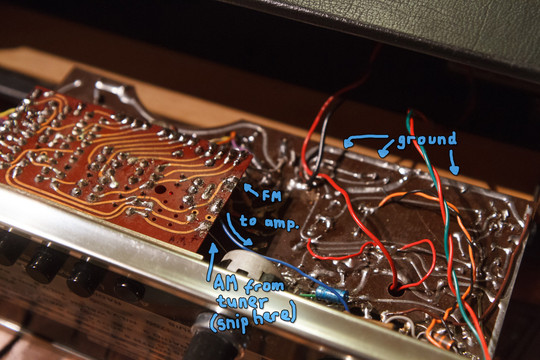
Tracing back across the PCBs, I soon located where the audio signals left the tuner circuitry and entered the switchboard on the top. By the looks of things, I'd be able to hijack at least one audio signal. But could I make the switches function?
At this point I reversed things - piping audio out from my laptop (Radiohead, appropriately enough) through some wires I could poke into the radio, tuned to a dead frequency. So, if I inject audio here... Radiohead coming out the radio's 1970s speaker, sounding startlingly good. Whatever the required specifications of this internal signal, the laptop's output was good enough.
I soon discovered that the AM tuner was separate from the FM tuner, with both feeding their audio signals into that switchboard on the top of the radio. While it appeared that the AM tuner would be powered down when the FM tuner was active (and various different circuits would get switched in and out for AM's LW, MW and SW), the switchboard and amplifier would work just fine with an always-on audio signal apparently coming from the AM tuner. So, given the paranoid racism on MW, the screeching interference on SW and lack of radio signals on LW, the AM wire would get the snip and a headphone jack added in its place.
Entertainingly, it seems to apply some sort of low-pass filter when the LW button is engaged. So a high-fidelity input signal ends up with some authentic LW muffling. Awesome.
Cue some quick surgery on a damaged headphones extension cable, extended with inappropriately thick wires and the join insulated with some off-brand Sellotape...
... And then to solder this mess into the radio! 3.5mm headphone cable, tip and centre of jack connected to the AM audio in, shroud connected to ground. I may have promptly stabbed the leather-effect Rexine with the soldering iron. Oops. Luckily it healed suspiciously well.
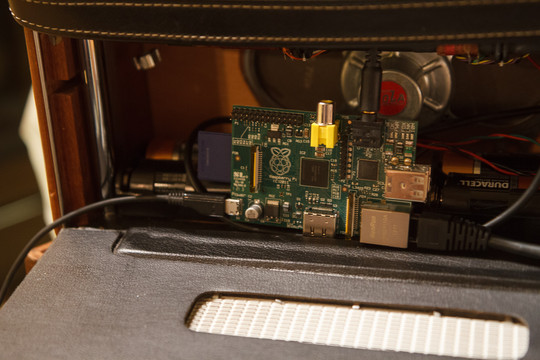
Some vigorous testing connected to the laptop proved the amplifier was more than adequate for the task (Radio 4 being simulated with pre-recorded Just a Minute and I'm Sorry I Haven't A Clue), then it was time to emplace the Raspberry Pi - held in place by the batteries, back panel and cabling...
Right now, there's a 5V power cable poking out the back - the photos above were taken when it was still connected to the intertubes via ethernet, but as of this evening the radio is properly a radio thanks to a handy little USB WiFi module. Setup was pretty easy, but I think I'm going to have to do some modding to this very-early Pi with the dodgy polyfuses. It's cut out a few times already...
Still, the all-important to-do list:
- Add 12V power supply, so the radio's not permanently running off batteries. The radio's battery life seems great, but I do need to characterise current and voltage requirements before buying any potentially underpowered kit.
- Attach DC-DC step-down power supply to 12V, for providing the Raspberry Pi with a nicely stable 5V. Component ordered!
Edit 2013-06-30: - I finally got round to making the whole thing run on mains power. Those batteries were finally deciding to get a bit faint...
When all this is done, I'll have a fully independent Raspberry Pi sealed inside a 1970s radio - the only clue to the radio's modified state being the Pi's activity LEDs gently visible through the air grille at the back. On VHF, it's still a conventional radio - but on any of the AM bands, it's a mysteriously intercontinental, time-travelling device. A fully-reversible hack - doing anything else to this magnificent old beast would have been cruel. It's hard to describe the audio quality, other than meaty - the tinny PWM-iness of the Pi's analogue-out has somehow combined with the chunky 1970s transistors to give something quite glorious. It's neither 'good' nor 'accurate', it's better than that...
Next up, the all-important software!
Article comments (now closed)
2. Re: 12 volt power
Posted by Cargo Cult at 7:01PM, Saturday February 23 2013
('Scuse the slow reply - been pretty busy with other stuff.)
Super-useful information there, thank you! Unfortunately I went and ordered a 12V switched power supply which may or may not exhibit instabilities - I've yet to connect it up. But the description of the potential issues mean I'll know what to look into if it does turn up...
(The radio's battery life is sufficiently good that it's not super-urgent that I do hook this up to the mains. I think I've been conditioned by modern electronics - this old thing is surprisingly miserly with the power!)
Thanks again! Also, to anyone converting old radios to these digital superhighways, please, please do send photos: afoster@hylobatidae.org
3. power
Posted by Bizmo at 2:47PM, Thursday April 25 2013
how did you get this running in the end? I'm doing a very similar mod on a slightly older roberts r300, but when I run the power from the power supply to the pi and the radio and then connect the pi to the radio via its 3.5mm jack however there seems to be some sort of issue with grounding as all the power goes to the speaker resulting in a loud humm and nothing else. The pi works when connected to another speaker and the speaker works when connected to another pi so it must be the combination of the two...
4. I'd love one!
Posted by Jonny at 4:29PM, Thursday December 12 2013
I'm down in Oregon, and of Brit-extraction too and have conceived this idea before now - but have none of the know how or aptitude that you do... Would you consider making one for me, for sale?
Podcasts are fine, and what I utilize, but this is just a bomber idea and executed with style!
5. Wow
Posted by julesd at 6:42AM, Wednesday February 12 2014
I love this... I recently snagged an old broken roberts from a UK website called freecycle. The lady said she hoped someone could get it working. As it is already broken, I doubt I will have the same worries as you did about gutting it to hack it, however, I am a little bit unsure how I should re-use the buttons and dials... I actually want to use it as a portable mp3 unit, and I would really love to fake 'tuning' between already running playlists... i.e. have say... a rock station and a funk station with white noise in between them on the dial.
Don't want much, do i?
Article is now closed for commenting.




1. 12 volt power
Posted by Campi at 6:44AM, Sunday February 17 2013
I have the exact R707 radio complete with mains power supply. The original power supply delivered with this radio was 12v 400mA, LINEAR - don't use a switching powers supply as you may get a "motorboating" instability. I happened to have a 12v 2 amp linear supply in my spare parts box. A small 12v/5v DC/DC converter did the trick to power the Rapberry Pi, and I now have a real-time Internet radio.
Thanks for a superb article, and enjoy your time-shifted Radio 4.
Campi